")
")
|
This article is a guide to building an APRS LoRa network using OE5BPA software. In the meantime, I use CD2RXU softwares. |
Principle :
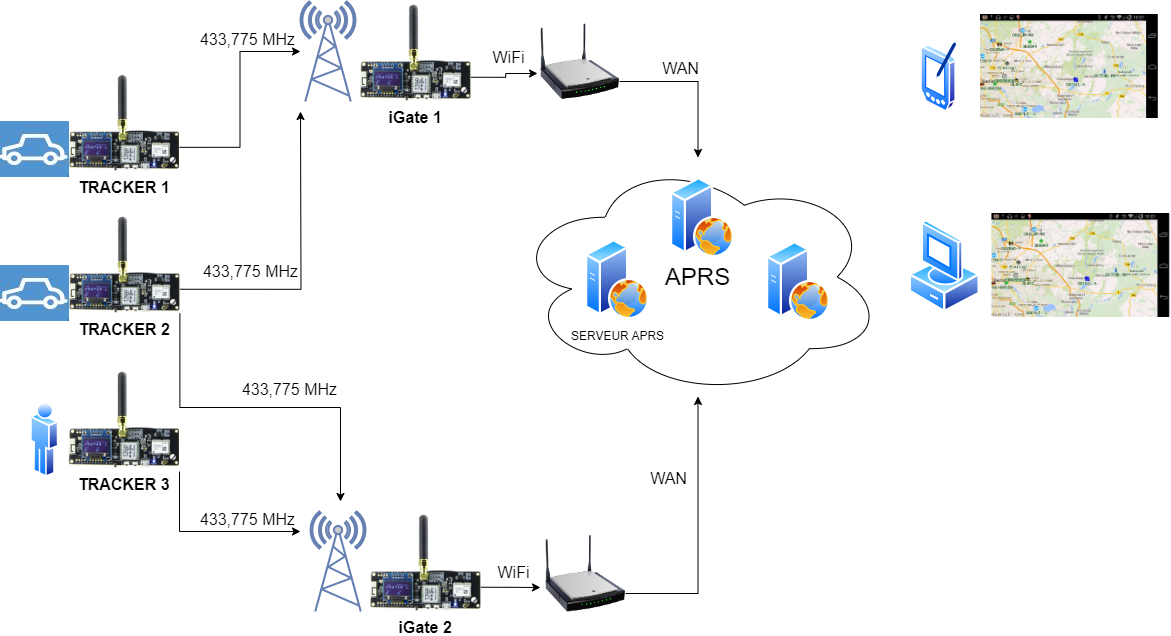
Trackers are used to transmit their geographical position in real time via LoRa modulation on the 433.775 MHz frequency.
They are built using ESP32 LoRa modules, which comprise a 433 MHz transmitter/receiver, a GPS receiver, a WiFi module, a microcontroller and an OLED display. They are generally installed in vehicles or in pedestrian mode.
iGate" systems receive the frames sent on 433.775 MHz by Trackers and inject them into the APRS network via Internet access.
They are built with ESP32 LoRa modules almost identical to the Tracker, but without the GPS receiver, which is not useful. They are installed in fixed positions on high points, or in urban areas, to ensure the widest possible coverage.
Tracker and iGate positions can then be viewed by the community on maps using a browser on a computer or PDA connected to the aprs.fi or aprs.radioamateur.tk websites, for example.
Used equipments :
For the Tracker, the LILYGO TTGO T-beam v1.1 433 MHz band module.
It features an ESP32 processor, NEO-6M GPS, 0.96" OLED display, Lora transceiver, WiFi and Bluetooth.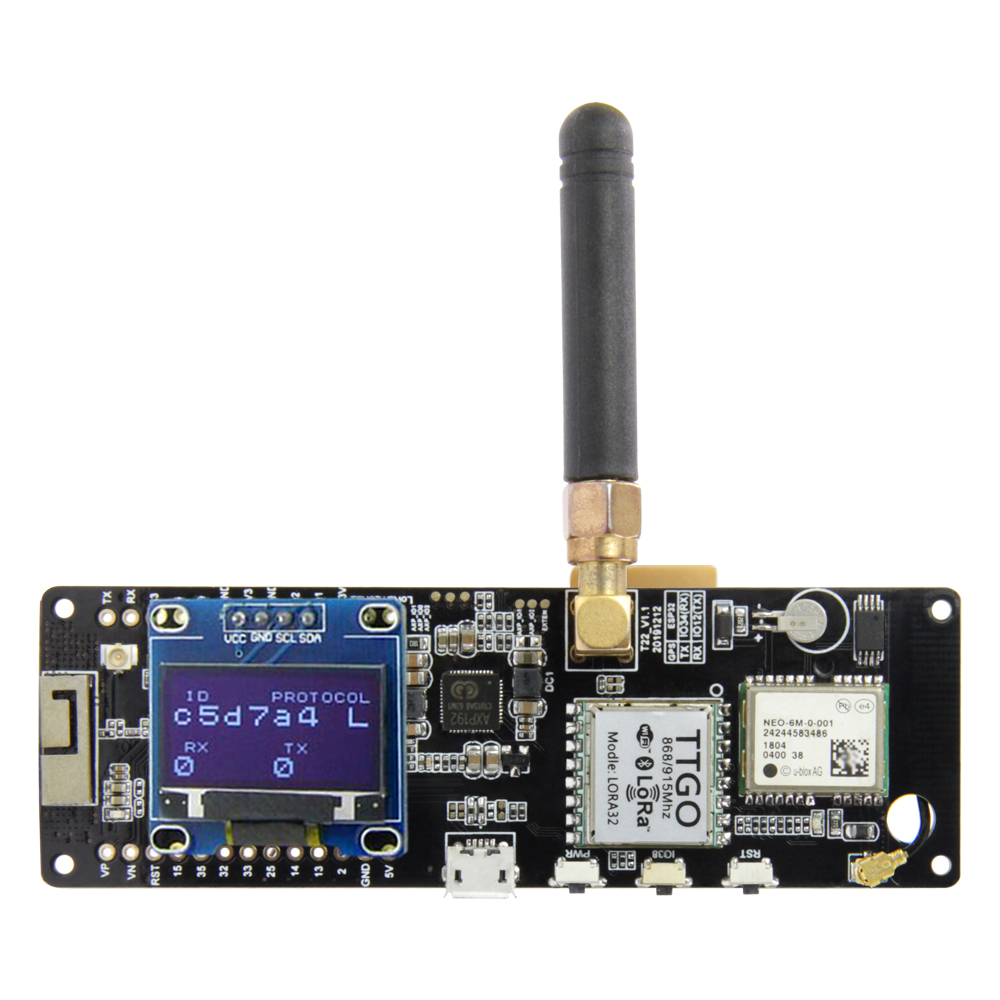
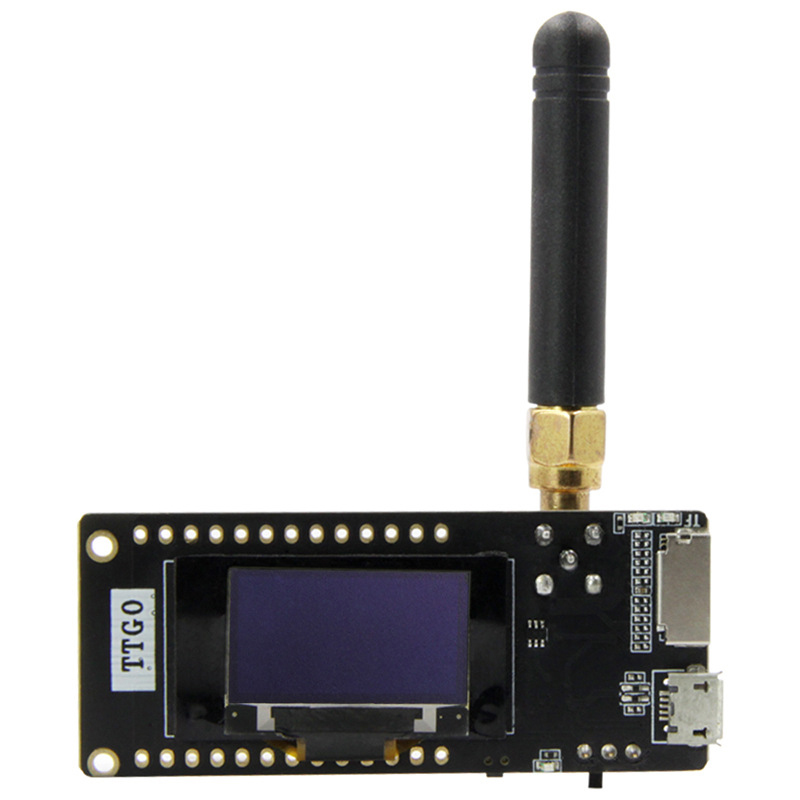
For the iGate, we can make do with a LILYGO TTGO T3 v1.1.6 module.
It has the same features as the T-beam, except for GPS, which isn't really necessary for a fixed-installation gateway. It's a little less expensive, although the trend is to reduce the price difference.
.
Used softwares :
Tracker and iGate are designed to be installed using the Visual Studio Code (VSC) editor and PlatformIO extension.
You therefore need to have these programs installed beforehand.
This article is not intended to explain how to install these programs. Tutorials are available elsewhere.
Software for the iGate LoRa is available at :
https://github.com/lora-aprs/LoRa_APRS_iGate
The Tracker software is available on :
https://github.com/lora-aprs/LoRa_APRS_Tracker
Retrieve archives from the following sites like this :
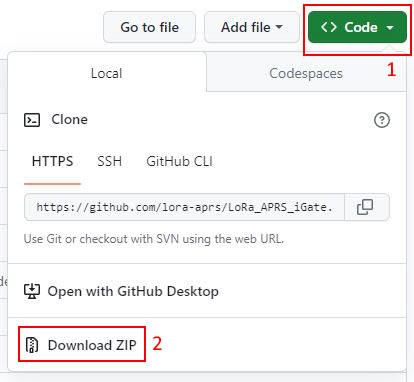
Next, unpack the ZIP archives and place them in a location on the computer's hard disk.
With VSC, select "Files" + "Open a folder" and choose the appropriate folder to load the desired software.
Preparing installation :
Before installing anything, check that the module works with the software installed on delivery (display, GPS, etc.).
This check removes any doubt in the event of a future problem, and avoids wasting time during subsequent operations.
Connect the ESP32 module to the computer via a USB port.
The Device Manager should recognize the COM port used. If it doesn't, you'll probably need to install the correct USB driver, depending on the modules and interface circuit used. I had to install the CH9102 driver.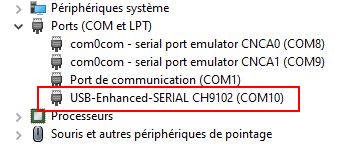
iGate configuration :
Only the data/is-cfg.json file needs to be modified to suit our situation.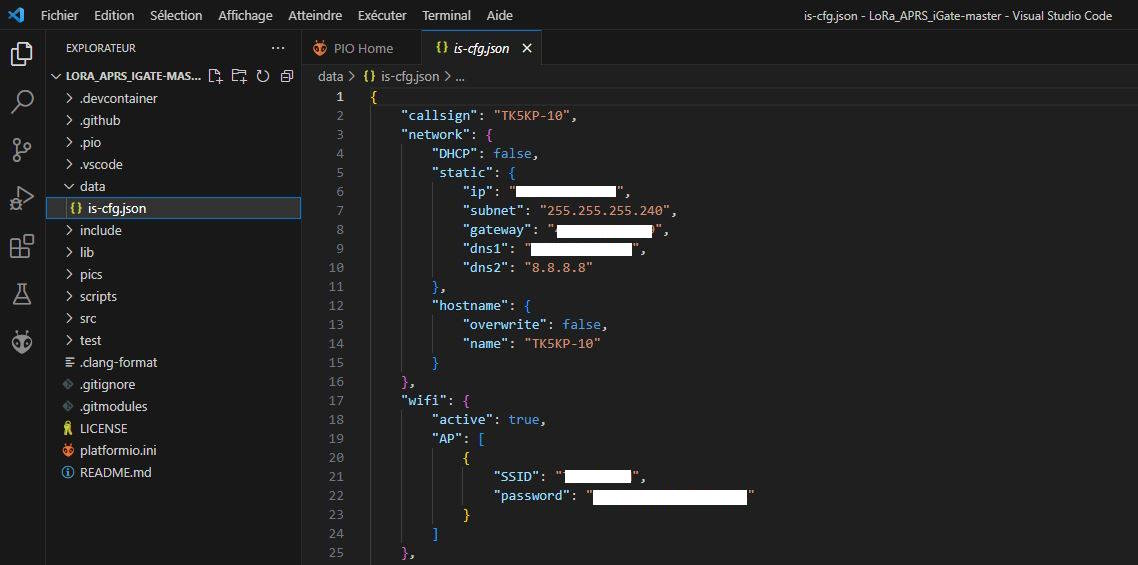
| Callsign | Pour un iGate, saisir l'indicatif et l'extension -10. | |
| Network | DHCP | DHCP : true si on souhaite que l'adresse IP soit attribuée automatiquement ou false pour une adresse IP fixe. |
| ip | En IP fixe, renseigner les champs à convenance suivant votre réseau local | |
| subnet | " | |
| gateway | " | |
| dns1 | " | |
| dns2 | " | |
| Hostname | overwrite | |
| name | ||
| wifi | active | Laisser à true pour utiliser le wifi pour se connecter à Internet. |
| SSID | SSID du réseau WiFi utilisé | |
| password | Mot de passe du réseau WiFi utilisé | |
| Beacon | message | Renseigner le message de la balise qui sera visible en cliquant sur l'icone du iGate sur la carte APRS |
| position | Saisir la latitude et longitude au format décimal avec un point comme séparateur | |
| use-gps | False si votre module ne possède pas de GPS, true avec un GPS. | |
| timeout | Période en min. pour la transmission de la balise | |
| APRS_IS | active | |
| password | "mot de passe" réseau APRS. Nombre à 5 chiffres qui n'a rien de secret. Il peut être obtenu en ligne à l'adresse : https://apps.magicbug.co.uk/passcode/ |
|
| server | serveur APRS utilisé, laisser par défaut sauf cas particulier | |
| port | port utilisé par le serveur, laisser par défaut sauf cas particulier | |
| filter | ||
| digi | active | False : l'iGate ne fonctionnera pas en digipeater |
| beacon | False : le digipeater ne transmettra pas de balise | |
| lora | frequency_rx | Fréquence de réception, par défaut 433775000 |
| gain_rx | Gain du récepteur | |
| frequency_tx | Fréquence d'émission, par défaut 433775000 | |
| power | Puissance émetteur en dBm. max 20 dBm ( 100 mW ) | |
| speading_factor | SF du signal LoRa, laisser 12 par défaut | |
| signal_bandwidth | largeur en kHz du signal LoRa, laisser 12 par défaut | |
| coding_rate4 | 5, laisser par défaut | |
| tx_enable | false : désactive l'émetteur | |
| display | always_on | true : L'afficheur restera allumé en permanence, false : l'afficheur s'éteindra suivant les paramètres ci-dessous |
| timeout | Durée d'allumage de l'écran en sec | |
| overwrite_pin | Numéro de pin du module pour connecter un poussoir pour réveiller l'afficheur. (ne fonctionne pas pour le moment) | |
| turn180 | Rotation de 180° de l'affichage. true : normal, false : rotation | |
| ftp | active | Active le serveur ftp interne. Possibilité de maj à distance du fichier de config. false: sans |
| name | Identifiant pour l'accès ftp | |
| password | Mot de passe pour l'accès ftp | |
| mqtt | active | Valide ou pas l'envoi des données au format MQTT |
| server | Serveur MQTT de destination | |
| port | Port du serveur MQTT | |
| name | ||
| password | Mot de passe du serveur | |
| topic | Nom du topic | |
| will_actice | Paramètres du message WILL | |
| will_topic | " | |
| will_message | " | |
| birth_message | " | |
| syslog | active | Activation du log |
| server | ||
| port | ||
| ntp_server | Adresse du serveur NTP pour maj de l'heure du module |
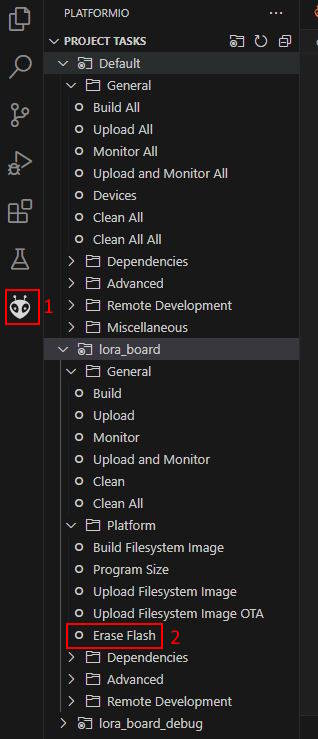
Once the parameters have been modified, you must :
- leave the choice of default environment [1].
- compile the software and transfer it to the module [2]
This operation may take some time the 1st time it is performed, as missing libraries are downloaded.
If all goes well, message [3] should display SUCCESS in the terminal window.
It may happen that the VSC editor does not correctly detect the serial port to which the module is connected.
In this case, you may need to add a parameter to the platformio.ini configuration file and restart compilation.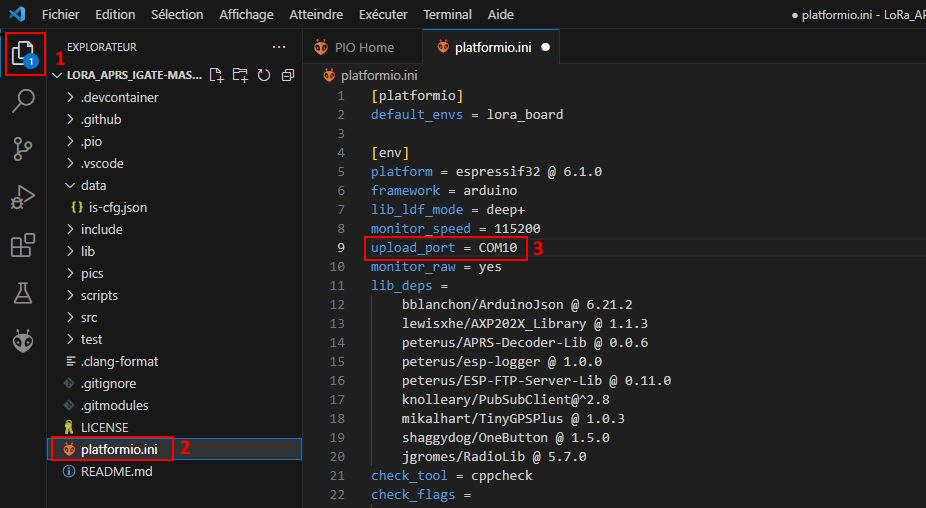
All that remains to be done is to transfer the file system image, which contains the parameters.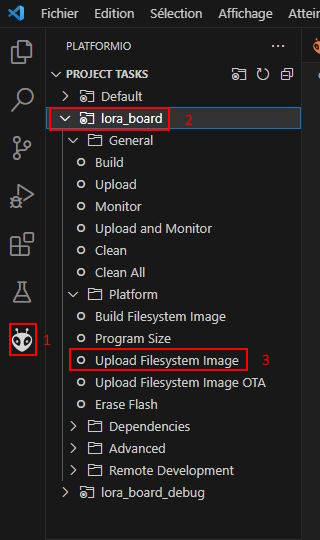
Si tout va bien, au bout de quelques instants, SUCCESS devrait s'afficher dans la fenêtre terminal.
Tracker configuration :
Once the directory has been loaded, as for the iGate configuration, we need to modify the tracker.json configuration file [2], adapting the parameters to our needs [3].
![]()
| Beacons | Callsign | Indicatif du tracker avec un SSID. Choisir le SSID d'après : http://www.aprs.org/aprs11/SSIDs.txt |
| path | Contrôle la retransmission des paquets. Laissez WIDE1-1, plus d'infos : https://blog.aprs.fi/2020/02/how-aprs-paths-work.html | |
| message | Message qui sera affiché lors d'un clic sur le Tracker sur la carte aprs.fi | |
| timeout | ||
| symbol | En combinaison avec le paramètre overlay, détermine le symbole qui apparaîtra sur la carte pour désigner votre tracker | |
| overlay | Plus d'infos : http://www.aprs.org/symbols/symbolsX.txt. Par exemple un coureur : symbol = / et overlay = [, une voiture /> | |
| min_bcn | Intervalle entre chaque transmission en minutes | |
| Les autres paramètres ne devraient pas être modifiés pour rester compatibles avec le réseau APRS LoRa. |
The program must then be compiled and transferred [4] to the module. This may take some time on the first run, as the missing libraries are downloaded.
If all goes well, the message SUCCESS [5] should finally appear in the terminal window.
All that remains is to transfer the file system [3] after selecting the module to be used [2], as shown below.
![]()
At the end of the transfer, the message SUCCESS [4] should appear. If this is the case, the game is won!
After all these operations, with the modules powered up, you should have your node and tracker visible on aprs.fi and aprs.radioamateur.tk.
Tracker usage :
At regular intervals (min_bcn parameter), the Tracker sends a LoRa frame on 433.775 MHz with the Tracker's position.
Transmission only takes place if the GPS is picking up at least 4 satellites and has made a GPS fix. Check that this is the case by looking at the display, which should show the number of satellites received (SAT = ).
The module's central button has several functions:
- a simple click forces transmission of the beacon. The frame content is displayed on screen during transmission.
- a double-click turns off the screen to save battery power, reducing consumption from 110 mA to ? mA.
- long press displays beacon text (message parameter)
Possible problems :
- No communication with the module: Change the USB cable and check that the USB port is correctly detected (see above).
- On first use, the Tracker GPS may take a very long time to make a first GPS fix (up to 20 min). If no fix is possible, this may be due to a problem with the previously installed software, which is blocking dialogue with the GPS module. In this case, you need to reset the GPS by installing the following software:
https://github.com/lora-aprs/TTGO-T-Beam_GPS-reset
Install and transfer the software in the same way as with VSC. The Tracker software must then be reinstalled.
- Despite a successful transfer, the screen remains black when the module starts up: check the OLed screen wiring, reset the flash memory and load the software again.
Links :
Visual Studio Code
Driver for chip CH9102
iGate LoRa map
aprs.fi
aprs.radioamateur.tk
Symbols for APRS icons
GPS reset