")
")
| |
This article is essentially a personal memo, but may be useful to others. AllStarLink is a network of Amateur Radio repeaters, remote base stations and hot spots accessible to each other via Voice over Internet Protocol. It is the software we use on our private TKNet network. Acronyms TX timings RX & TX audio levels settings Language change Sound files GPS.conf for APRS Beacon via crontab |
Acronyms :
ASL: All Star Link
CLI : Command Line Interface
COR : Carrier Operated Relay (Squelch)
CT : Courtesy tone (beeps)
ID : IDentification (voice or CW beacon)
URA : USB Radio Adapter
URI : USB Radio Interface
Note : The procedures below are only for a DUPLEX operation with 25 kHz channel spacing and the use of an interface with a sound card (DSP) and a USB interface as the USB audio interface developed for our TKNet network.
Configuration files :
The main files to modify are rpt.conf, usbradio.conf (or simpleusb.conf), iax.conf, modules.conf, extensions.conf, dnsmgr.conf.
Depending on the type of USB interface and/or type of radio, you have to choose the right interface.
For a radio without pre-emphasis or de-emphasis or without a CTCSS decoder, choose usbradio.conf which uses a DSP and can therefore decode CTCSS and allows more functions.
For a simpler configuration, use simpleusb.conf.
You have to activate only one of these modules in the modules.conf file
Then, you need to determine the node number that will be used depending on the environment. (node to node connection, AllStarLink public server or private server)
The usbradio.conf file contains the "hardware" configuration of the transmitter and receiver used.
Operation of the sound card, simplex, duplex, CTCSS frequencies, various delays, audio filters, pre-emphasis/de-emphasis, PTT status and squelch.
The rpt.conf file contains the node configuration, telemetry (beacons), morse code, audio levels, DTMF commands, etc.
The modules.conf file configures the modules that will be loaded at start-up.
It is necessary to put load in front of the interface type :
load => chan_usbradio.so
The extensions.conf file is used to route incoming connections to the correct node in app_rpt.
The iax.conf file defines how to register a node with the Allstar link node allocation authority, and assigns a context that incoming connections receive so that the statements in extensions.conf can direct the connection to the correct local node. iax.conf contains two sections relevant to app_rpt. The [general] section, and the [radio] section.
The dnsmgr.conf file is used to configure the Allstarlink DNS update service
In case a connection to the AllStarlink network is not desired:
enable = no
Timings :
The different settings of the RX/TX sequencing timings and delays are a bit complicated to understand because of their names.
The time diagram below helps to understand them better.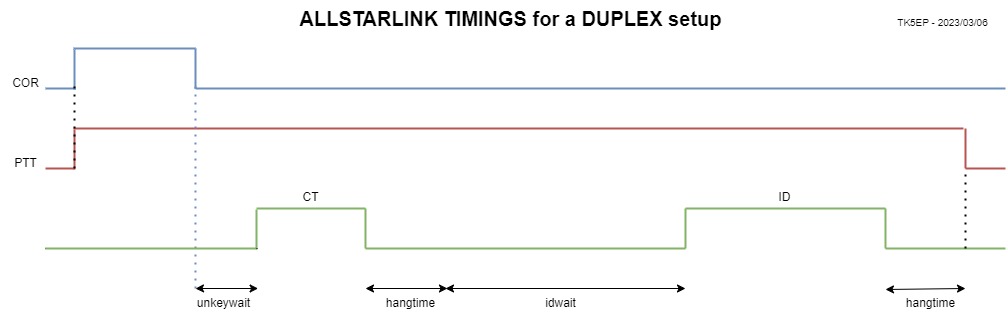
In rpt.conf
[wait-times]
telemwait = 2000 ; Time to wait before sending most telemetry
idwait = 1000 Time to wait before starting ID)
unkeywait = 1000 ; Time to wait after unkey before sending CT's and link telemetry
calltermwait = 2000 ; Time to wait before announcing "call terminated"
[8] (or your node number)
hangtime = 500 ; squelch tail hang time (in ms) (optional, default 5 seconds, 5000 ms)
althangtime = 0 ; longer squelch tail
totime = 60000 ; transmit time-out time (in ms) (optional, default 3 minutes 180000 ms)
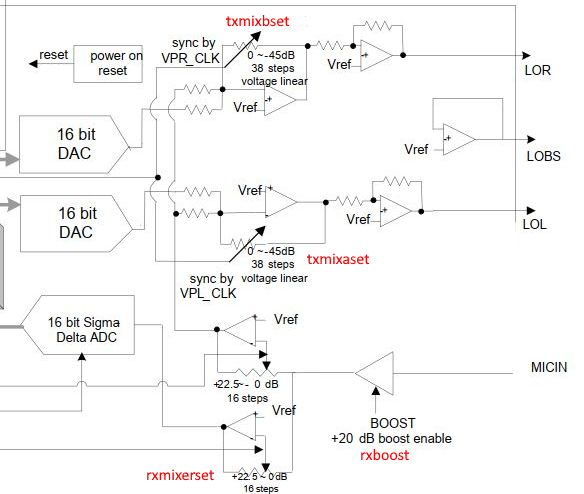
The following is a synopsis of the operation of the LF stages in the CM109 with the assigned audio parameters
Good calibration of the audio levels is essential to ensure good retransmission quality and a constant level from node to node.
If the URI interface card has its own transmit and receive level settings (pots), start with mid-range settings.
The difficulty is to keep an acceptable audio level for the DSP chip input.
Pre-emphasis and de-emphasis must take place somewhere, and only once!
They take place either in the transmitter (pre-emphasis), the receiver (de-emphasis), or in the interface board via the Asterisk DSP.
It's best to use the Asterisk DSP to ensure the same audio bandwidth on all nodes. This requires that the receiver and transmitter used have an unprocessed output and input, also known as a "discriminator", "direct", "flat", etc...
In addition, DSP operation of CTCSS decoding and squelch often are better than those of the receivers.
If the receiver has no discriminator output, use mode rxmode = "speaker". If the transmitter has no direct input, use mode txprelim = yes.
Note 1 : In the following procedures, if the test bench allows a choice between different bandpass or lowpass filters for audio detection, use the 0.3-3 kHz bandpass filter. The additional deviation introduced by the CTCSS should not be taken into account. (to be checked)
It will then not be necessary to disable/enable CTCSS generation in the following procedures.
CTCSS deviation is measured using the test bench's 300 Hz low-pass filter.
Some test benches don't have all these options, so you'll need to take that into account when making your settings.
Setting the transmitter audio level
Checking the maximum deviation of the transmitter
1) Disable CTCSS generation in the transmitter. (If CTCSS is not used or see note 1, this step and steps 6 and 7 are not necessary)
2) Connect the AF generator to the TX audio input being used (microphone or other depending on model). Set the level as low as possible and the frequency to 1 kHz sinusoidal. Connect the TX antenna output to the test bench and switch to transmit.
3) Check the deviation, and increase the AF level gradually until the deviation does not increase. This is the maximum possible deviation through the TX.
If the input is direct to the modulator, then the maximum deviation can be very high.
4) If the deviation is greater than 5 kHz, adjust the adjustment potentiometer or the software value for maximum deviation of the transmitter to 5 kHz. Some distortion is likely to occur as the TX limiter has kicked in.
5) Reduce the level of the AF generator to achieve a deflection of 3 kHz, there should be no distortion. Note the value of the AF generator voltage.
6) If necessary, reactivate the CTCSS generation in the transmitter.
7) If the deviation value has changed (see note 1 above), it should not exceed 3.6 kHz. If so, adjust the CTCSS level on the TX to this maximum value of 3.6 kHz.
With a transmitter that has a pre-emphased modulation input. ( mode txprelim=0 )
Set the value of txmixaset or txmixbset = 500 (usbradio_tune_usb.conf file) to start. Increase or decrease it later if necessary.
txmixa = voice ou composite
txmixb = no
txprelim = no
txlimonly = no
txtoctime = no ; ou autre suivant convenance
1) Disable CTCSS generation in the transmitter. (see note 1 above)
2) Check if the command "Test tone on/off cop,4", normally *904 in rpt.conf is enabled. If not, validate it and restart Asterisk.
3) Switch to Asterisk CLI mode, online command mode. (asterisk -r)
4) From the CLI, type rpt fun node *904 (node = number of the node to test)
5) The transmitter should go into transmit mode and transmit a 1 kHz tone. Adjust the URI potentiometer to obtain a deviation of 3 kHz, or change the txmixaset (or txmixbset) value using radio tune txvoice xxx (0-999)
6) Disconnect the transmission with the command rpt fun nr_du_node #.
7) If the CTCSS has been switched off, switch it on again and repeat the 3 previous steps. The deviation should not exceed 3.6 kHz.
If not, adjust the CTCSS generation level for a maximum deviation of 3.6 kHz using the internal TX setting if TCS is generated in the TX.
8) If the TCS is generated by the sound card: radio tune txtone xxx to obtain a CTCSS deviation of 600 Hz
If the level is not sufficient or too high, change the txmixaset value and repeat the procedure.
With a transmitter without pre-emphasis (flat mode txprelim = 1)
Set txmixaset = 500 (usbradio_tune_usb.conf file) to start with. Increase or decrease it later if necessary.
txmixa = composite
txmixb = no
txctcssdefault = 88.5
txprelim = yes
txlimonly = no
txtoctime = no
1) Check if the command "Test tone on/off cop,4" (normally *904) in rpt.conf is enabled. If not, validate it and restart Asterisk.
2) Switch to Asterisk CLI mode, online command mode. (asterisk -r)
3) Enter radio tune txtone 0, to stop TCS generation.
4) From the CLI, enter rpt fun node *904 (node = number of the node to test) or use the DTMF command *904
5) The transmitter should go on transmit and transmit a 1 kHz tone. Adjust the URI potentiometer to obtain a deviation of 3 kHz, or change the txmixaset (or txmixbset) value using radio tune txvoice xxx (0-999)
6) Cut the transmission with the command rpt fun nr_du_node #.
7) Enter radio tune txtone xx, set the xx value for a deviation of 600 Hz. The transmission takes only a few seconds. Pay attention to the measurement with the bench (note 1)
8) Enter rpt fun nr_du_node *904, to transmit the 1 kHz AND the TCS simultaneously
7) The deviation must not exceed 3.6 kHz (1000 Hz measurement + TCS). Pay attention to note 1!
If not, adjust the CTCSS generation level for a maximum deviation of 3.6 kHz.
If the level is not sufficient or too high, change the txmixaset value and repeat the procedure.
Note: It seems that if the txmixaset + txctssadj value > 1000, distortion may occur. You should therefore use the 2 audio outputs of the DSP and dedicate the left channel (txmixaset) for the voice and the right channel (txmixbset) for the TCS.
Adjusting the receiver audio level
The MICIN input of the sound card chip is connected to the receiver. The voltage must be high enough to allow correct decoding but not too high to saturate the DSP input. (500 mV for example)
Start by setting the parameter rxboost = 0 to insert the 20 dB attenuator (the CM109 doc. talks about an amp that doesn't actually exist)
The amp that injects the signal into the ADC is set by the rxmixerset parameter, (usbradio_tune_usb.conf file). Start with a value of 250 (from 0-999).
If the settings do not give good results, change this value.
For a receiver with de-emphasis (output on speaker or LF preamp) :
rxdemod = speaker
rxctcssoverride =1 (squelch par détection de porteuse issu du récepteur)
carrierfrom = usb ; ou usbinvert (signal squelch vient de la carte interface USB)
ctcssfrom = no (pas de détection du CTCSS par DSP)
1) Inject a signal of several microVolts modulated at 1 kHz with a 3 kHz excursion into the receiver.
2) In CLI mode, type radio tune rxvoice, the software will adapt the LF level after several measurements.
3) Type radio tune save to save the settings which will be read at each start-up. (usbradio_tune.conf file)
4) Turn off the generator, to avoid a bug when rebooting Asterisk.
5) Reboot Asterisk by typing rpt restart, and check if the transmitter excursion follows linearly the receiver one. ( 1kHz -> 1kHz, 2 kHz -> 2 kHz, etc...)
For a receiver with a non-de-emphasis output (FM discriminator output):
rxdemod = flat
carrierfrom = dsp (détection de porteuse vient du DSP de la carte interface USB)
ctcssfrom = dsp (détection CTCSS vient du DSP de la carte interface USB)
1) The receiver should have no squelch and therefore generate permanent noise without signal.
2) In Asterisk CLI mode, type radio tune rxnoise, and the software will take several measurements and calculate an average value.
3) Inject into the receiver a several microVolts signal modulated only with a 1 kHz audio with a 3 kHz deviation (without CTCSS).
4) In CLI mode, type radio tune rxvoice , the software will adapt the AF level after several measurements.
5) Switch off modulation at 1 kHz, and modulate with the desired TCS tone (88.5 Hz) with 600 Hz deviation.
6) Type radio tune rxtone for automatic setting of CTCSS decoding.
7) Switch off generator.
8) Squelch adjustment: entering radio tune rxsquelch will give the measured value of the squelch threshold. Note this value. The level of the rxsquelch parameter must be set approximately 50-100 higher than the measured value for correct operation. Type radio tune rxsquelch <value> (between 0 and 999)
9) Type radio tune save to save the settings, which will be read at each startup. (usbradio_tune.conf file)
10) Switch off the generator, to avoid a bug at Asterisk reboot.
11) Reboot Asterisk by typing rpt restart, and check that the transmitter's deviationlinearly follows that of the receiver. ( 1kHz in-> 1kHz out, 2 kHz -> 2 kHz, etc...)
By default, ASL comes with English sound files.
They are in /var/lib/asterisk/sounds
To change the language and use French sound files for example, you need to create a tree structure identical to the one found in the sounds directory.
Namely:
fr/rpt
fr/digits
fr/letters; etc...
Then place the French sound files in the same directories as for the English version.
To activate the French version, modify the file /etc/asterisk/asterisk.conf
If the stanza [config] does not exist, create it.
Add the following line: languageprefix = yes
Modify the file /etc/asterisk/chan_dahdi.conf
In the stanza [channels], add the line: language = fr
Restart Asterisk.
ASL uses sound files for telemetry and beacon functions.
These files are mainly in ulaw format which is a standard used by Asterisk and is a US standard designed for telephony.
It is a format without data compression or RAW.
Be careful, some softwares or websites provide files in RAW-ULAW format, but with a RIFF header which generates a parasitic noise at the beginning of the reading by Asterisk. It is absolutely necessary to obtain ulaw files without headers.
You can use the free software Audacity which allows you to record a sound file, manipulate it and save it in the right format.
You can either record the file with a microphone or use an online TTS (Text to Sound) generator.
Most of these generators require a subscription to save the created sound file. But there is a way around this by recording the browser's demo sound using Audacity.
Once the sound file is obtained, it must be switched to mono if it was recorded in stereo:
- Track" menu
- Sub-menu "Mix".
- Choice "Stereo to mono mix".
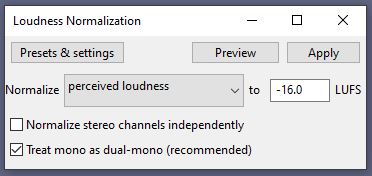
So that all the sound files have the same volume, the level must be normalised:
- Effects" menu
- Volume and compression" submenu
- Choice "Amplitude normalisation".
You must then choose a method and a level of normalisation. Here LUFS at -16 dB.
The only thing left to do is to save the file in the correct format, i.e. ulaw :
- Export" menu
- Sub-menu "Export to WAV".
- Choose the right formats as below: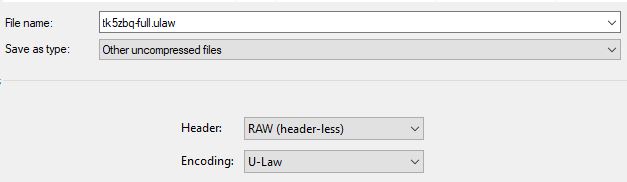
APRS configuration, file gps.conf
To make the APRS function work, the module app_gps.so must be loaded in /etc/asterisk/modules.conf (changing noload to load)
This file is used to set up the APRS tag if you want to send the coordinates of a relay on the APRS network.
Below is an example for one of our sites:
call = TK1ZAR              ; callsign (including SSID) for APRS purposes
password = 12345           ; Password for APRS-IS server for above callsign
comment = Sud UHF (430.175, +9,4, TCS 88.5) http://tknet.radioamateur.tk ; Text to be displayed associated with this station
server = xxxxx.net         ; APRS-IS server to report information to
port = 14580               ; port on server to send data
interval = 600             ; Beacon interval in seconds
icon = r                   ; A CAR (default)   Icon do be displayed for station on APRS display (see below)
;comport = /dev/ttyS0      ; Serial port for GPS receiver (specify this only if using GPS receiver)
;baudrate = 4800           ; Baud rate for GPS receiver (specify this only if using GPS receiver)
;debug = y                 ; set this for debug output
freq= 430.175              ; Display Frequency of station
tone=88.5                  ; CTCSS tone of station (0.0 for none)
lat=41.653192              ; Fixed (default) latitude in decimal degrees
lon=9.178372               ; Fixed (default) longitude in decimal degrees
elev=1068                  ; Elevation of Antenna in Meters (*NOT* HAAT)
power=3                    ; Power level (see below)
height=8                   ; Antenna Height in HAAT (see below)
gain=3                     ; Antenna Gain (see below)
dir=0                      ; Antenna Direction (see below)
If no GPS receiver is connected to the controller, the comport and baudrate lines MUST be commented. Enter the lat and lon values.
The values power, height, gain, dir are coded on a single digit from 0 to 9. This results in an important approximation.
If power = 0, only the comment information will be transmitted. This is useful if you do not want to broadcast the other information.
The HAAT value is NOT the altitude of the antenna above sea level, but the effective height of the transmitting antenna, which is the height of the antenna above the average height of the terrain between the distances of 3 and 15 km in the direction of the receiving antenna!
The following site allows you to calculate the HAAT of a site: https://www.itu.int/SRTM3/index-fr.html
WARNING, latitude and longitude values must be entered as 6-digit decimal values without commas or full stops!
In general, unless the repeater is located on a peak which is the highest in the region, the HAAT value is lower than the altitude above sea level.
Once the HAAT value is obtained, it must be converted to feet (feet = m x 3.281).
The data values for power, height, gain, dir can be converted using the table below, or they can be calculated:
power = the square root of your power
height = ln(HAAT/10) (ln = log neperian)
In both cases, choose the closest value.
DIGITS   0  1  2   3   4   5   6    7    8    9
-------------------------------------------------------------------
POWER    0, 1, 4,  9, 16, 25, 36,  49,  64,  81  watts  SQR(P)
HEIGHT  10,20,40, 80,160,320,640,1280,2560,5120  feet   LOG2(H/10)
GAIN     0, 1, 2,  3,  4,  5,  6,   7,   8,   9  dB
DIR   omni,45,90,135,180,225,270, 315, 360,   .  deg    (D/45)
Beacon broadcast with a crontab
You may want or need to broadcast a "beacon" using a sound file to a local node or to all nodes at regular intervals or at a specified time.
In crontab :
# Example of job definition:
# .---------------- minute (0 - 59)
# | .------------- hour (0 - 23)
# | | .---------- day of month (1 - 31)
# | | | .------- month (1 - 12) OR jan,feb,mar,apr ...
# | | | | .---- day of week (0 - 6) (Sunday=0 or 7) OR sun,mon,tue,wed,thu,fri,sat
# | | | | |
# * * * * * user command to be executed
For a broadcast on all nodes :
00 * * * * sudo /usr/sbin/asterisk -rx “rpt playback node# /sound_file"
For a broadcast on one node only :
00 * * * * sudo /usr/sbin/asterisk -rx “rpt localplay node# /sound_file"